
Most applications tend to have a common architecture where there is a front end application talking to a RESTful API which would allow access to a database lying underneath to enter or retrieve data to and from it. In this blog post I would be basically focusing on how to get this kind of an application architecture up and running using the three Amazon Web Services Amazon API Gateway, AWS Lambda and Amazon DynamoDB.
Amazon DynamoDB

AWS Lambda

AWS Lambda is a light weight compute service that allows us to execute a piece of code in response to some trigger like an API call or an event occurrence. A Lambda function can be created using any of the 3 languages Node.js, Java or Python (as of when this post was written). The most interesting thing about AWS Lambda is that we are only responsible about the piece of code we write and AWS handles all the infrastructure management aspects of it to provide us with the optimum performance.
Amazon API Gateway
Amazon API Gateway is a service that allows you to create API's in a matter of minutes without writing a single line of code! It has its own management console which depicts the API resources we have created hierarchically with the methods associated with all the endpoints. We can simply associate any endpoint to a Lambda function so that a call on that endpoint would trigger the Lambda function to execute. API Gateway also allows creating an endpoint to act as an HTTP proxy to another endpoint too.
The objective of this blog post is to provide you with a clear step by step guide on using these above said 3 services together and come up with a simple web application that makes HTTP calls an API to get some domain specific work done. Hang tight! its gonna be a long journey!
This tutorial would contain mainly 3 steps which namely would be
- Creating the database in DynamoDB
- Configuring a Lambda function to communicate with the DB and finally
- Configuring the API gateway to trigger that Lambda function upon an API call.
Before stepping on to the first step in our list, let's have an overview idea on the architecture of the application that we will be building.

Just by the looks of it, it looks quite simple and indeed it is. We will be creating a front end web application that makes HTTP requests to the API gateway. The API gateway would trigger the respective Lambda function which would talk with the relevant DynamoDB table to return the necessary data back to the API Gateway. Finally the API Gateway would send back the response to the front end web application based on the contract it has with the end user.
An important thing that needs to be mentioned here is about the regions selection available in AWS. AWS allows you to select a region from where the services are consumed from. For example, if you use DynamoDB in US East (N. Virginia) region, the actual infrastructure provisioning for you will happen actually in that area. This way you get to choose the closest region to your target customer to reduce latencies in communication and improve the performance of your application. This also provides the added advantage of having disaster recovery sites. How ever, currently, some services in AWS are supported only in some regions. For example currently Lambda functions can be created only in the regions US East (N. Virginia), US West (Oregon), EU (Ireland) and Asia Pacific (Tokyo). Therefore you need to make sure to select one of the above 4 regions when creating the DynamoDB table if you are to associate it with a Lambda function later on. It should be noted that for you to integrate some services together (like Lambda and DynamoDB), the relevant implementations should be done in the same region with each of the services. But this does not apply to each and every the Amazon service though.
There is no particular order for following the above said 3 steps. But just for the sake of clarity, I will follow the order they have been mentioned and start with the first step.
Login to your AWS account and under the Database category you will find the DynamoDB service. Click on it.

What you will be seeing next is the DynamoDB Dashboard which basically gives you some statistics (which probably won’t make much sense to you if you are here for the first time; which is perfectly alright!). Click on the Create table button to begin creating a table.
A bit of the domain stuff. The application we will be building is a simple employee directory that allows saving an employee’s details on a DynamoDB table and retrieving them back upon request. So for that we will create a table with the name Employee.
Going to bit of detail, the primary key in DynamoDB can either be only a partition key or a combination of a partition key and a sort key. The partition key is used as input to an internal hash function of which the output determines the partition where the item will be stored in. If only the partition key is used for the primary key, every record needs to have a unique value for that. The second type which is a composite primary key uses the partition key as usual to decide where the record is stored and the sort key is used to keep the items with the same partition key stored sorted in order. In this scenario, It is possible for two items to have the same partition key value, but those two items must have different sort key values. This primary key concept in DynamoDB makes it a deviation from the document databases like MongoDB which does not have a requirement like that.
Coming back to the table creation, let us give partition key as ‘id’ and select its type from the drop down list as Number. To make things simple let us not go for a sort key. Under the Table settings area keep ‘Use default settings’ check box ticked since we do not need to go for advanced configurations for the moment. Once all that is done you are good to create the table.
Next, we will add some sample data to the newly created table. We would find them useful when testing the lambda functions that we will be using to retrieve data from the DB. For that, go to the Items tab and click on Create item. On the dialog box that appears specify a unique id value and add 2 more fields ‘age’ and ‘name‘ with types Number and String respectively and click Save.

You can create another record following the same steps.

We have now completed the first step in our 3 step process. The database is set up with a table having sample data.
Next, we will be stepping on to working with the Lambda functions. For that, click on the Services menu on the navigation bar and under Compute, select Lambda. If the selected region does not contain any Lambda functions created earlier, you will be getting a home screen where you have to click on Get Started Now. If the selected region already has some functions created before, you will be seeing the list of those existing functions.
To start with, click on Create a Lambda Function.
The first step of creating a lambda functions prompts us to select a predefined template that would assist us in writing the Lambda function’s code. You can select the blueprint that suits your requirement or else skip that step if you want to write the code your own way from scratch. For this tutorial I will be providing you with a custom code snippet and so we will be skipping this step.
The second step deals with configuration stuff. You basically have to enter a name and a description. A best practice in naming a lambda function is to name it with some correspondence to the URL of the API endpoint that we hope to associate it with. For our case I plan on creating an endpoint employee/{employee-id} to call this lambda function and return the information of the passed in employee id. So I would name this lambda function ‘employee-employee-id’. The Runtime allows you to choose which language you are writing the code from. I have written my code in javascript and so I will be choosing Node.js. Paste the following code in the editor under Lambda function code.
var doc = require('dynamodb-doc');
var dynamodb = new doc.DynamoDB();
exports.handler = function(event, context) {
console.log("The context varible contents : " + JSON.stringify(context));
var id = parseInt(event.id);
var params = {
TableName: 'Employee',
Key: {
'id': id
}
};
dynamodb.getItem(params, function(err, data) {
if (err) {
context.fail(new Error(err));
} else {
context.succeed(data);
}
});
};
The first and the second lines of the above code makes it possible for the function to use the DynamoDB API.
exports.handler = function(event, context) {};
is kind of like a template code you have to use in almost every scenario you will be using Lambda. The code to be executed is put inside this function. The 'event' and the 'context' variables carry in some valuable data to the function scope. The event variable will have any of the values sent in by the API gateway (using mapping templates). The context variable will contain the context information (yeah obviously!). You will be able to see its exact contents once we create the function and test it.
Under Lambda function handler and role let handler have its default value index.handler and for the Role, something like lambda_dynamo should be selected. If there is no such role under Use existing role, you will have to create one with permission to use DynamoDB.
The advanced settings allows control over the code execution performance and maximum time a function call can run. We will not need to pay attention to these for the moment and can be left with the default values. Once you click next, you will see a review page with the Create function button.
Once the function has been created, AWS Lambda has this cool feature that allows us to test its execution. Before we test we need a way to specify the input values that will be coming into this function via the 'event' variable. For that click on the 'Actions' button and select 'Configure test event'. This editor that comes up has a sample object with sample key value pairs which basically is going to be the object being passed to the event variable as the test is run. With that said, you might have already figured out the code that you need to put there. In case you didn't, here is the code that needs to be put there.
{
"id": "1"
}
Once that code is put there, we are good to go ahead and test our function. Click on Save and test button, the function will run, parse the specified id string which in this case was '1' to an integer and query the database to retrieve the relevant record. The results are shown just below the code editor and hopefully, If you have followed the tutorial right, you should be seeing something like

You can also see the Log output on the right hand side which has the contents of the context variable printed in it.
One quick bonus tip: Lambda functions can be triggered in many ways to get different types of work done from it. One such interesting usage is a scheduled function that runs periodically. This can be configured by going to the Event sources tab and clicking on Add event source. There in the Event source type, select Scheduled event and give in the necessary configurations. This is not relevant to this application we are working on so I will not go into any further detail with this.
Up to now we have created the necessary DynamoDB table and configured and tested a lambda function that talks with the DB to return back the record of a passed in id value. This marks the end of the 2nd step in our 3 step process and we are now moving to the final step which is to integrate API Gateway to this game.
Go to API Gateway service and create a new API. Give a suitable API name and a description of your wish and click Create API.

The API is going to be having resources and methods and you will see what they mean in a moment. If you remember about the naming convention I used for naming the lambda function, I am expecting to have an endpoint like employee/{employee-id} to pass in an id value and get the relevant employee details in return. For that we will have to create 2 resources. Click on Create resource and give Resource name as employee and click Create Resource. Now click on the newly created employee resource on the left hand side hierarchy pane and click again on Create Resource. This time it is going to be the parameter id passed in from the query string. So we type employee-id in the Resource Name field and in Resource Path field modify the value to {employee-id} by adding curly brackets around.

To create a method click on the /{employee-id} resource and click Create Method. On the drop down list that appears, select GET and click on the check mark. What comes next is the configuration setup for our newly created method. Since we are going to incorperate this with our Lambda function we will select the Integration type as Lambda function (yeah obviously). And in the Lambda Region select the region that you created the lambda function in. Once the region is selected, enter the name of the lambda function that we created which is ‘employee-employee-id’. Finally click Save and click OK to give permission for this endpoint to invoke our Lambda function.

The next screen that comes up is going to give you a nice overview on how API Gateway handles the incoming requests and sends back the responses.

Digging into some detail, the Method request, Integration request, Integration response and Method response can be considered as the 4 stages of a request response cycle in API Gateway. The Method request allows you to define the contract you have with the end user in terms of requests. Integration Request gives you the chance to modify the incoming request to suit what ever the interface you have in the Lambda function. For instance that is where we specify the mapping template for passing the query parameter into the Lambda function. In the Integration response you once again get a chance to modify the output coming from the Lambda function to match the interface you have with the end user. For example, if the Lambda function throws an error, this is where you get the chance to map an error to a code to be sent back to the end user in the response. Finally the Method response stage is where you define those codes and the contract between the API and the end user with respect to responses. This is just a quick overview on what each of those stages mean and for the application we will be building, we will only need to go inside the Integration Request.
Click on Integration Request and in the screen that appears click on Mapping Templates. Click Add mapping template, type application/json in the text field that appears and click on the tick mark. Once that is done on the right hand side click on the pencil icon next to Input passthrough and select Mapping template from the drop down list. Type the following text in the editor that comes up.
{
"id": "$input.params('employee-id')"
}
}
This is where we tell the API Gateway, "hey, please pass this object to the Lambda Function with an attribute id assigned with the value that comes under the ‘employee-id’ parameter in the query string". This $input is a variable that API gateway provides to give us access to the contents in the input request. There are several other variables like $context, $stageVariables and $util and a complete documentation on how they can be made into use is available via the API Gateway Mapping Template Reference.
Once the template is specified in the editor, do not forget to click on the tick button next to the drop down list where you selected Mapping Template to save the changes.

We are almost done with our configurations and it’s time to test our API endpoint now. Once again API gateway also has this cool feature that allows us to specify any parameters in the endpoint and trigger an API call to see if the correct results are being returned. For that. click on Method Execution button next to Deploy API and click on TEST on the Client box. Next specify the value for the employee-id parameter and click the Test button.

If you could get the above screen, then congratulations! you just created a working endpoint that serves a GET request.
But it’s not over yet. For you to use this API and expose it to the world, you have to deploy it. For that click on Deploy API, select New Stage as the Deployment stage if you don’t have any stages created before. Enter relevant values of your choice to the rest of the fields and click Deploy.

On the very next screen you get to see the invoke URL for your very first API along with many other configuration options which I won’t be paying attention to in this post.

The invoke URL for the API I created is https://ubq7zz9sml.execute-api.eu-west-1.amazonaws.com/alpha
and technically, sending a GET request to https://ubq7zz9sml.execute-api.eu-west-1.amazonaws.com/alpha/employee/1
should return me the record of the employee with the ID as 1.
As expected it does.

XMLHttpRequest cannot load https://ubq7zz9sml.execute-api.eu-west-1.amazonaws.com/alpha/employee/1. No 'Access-Control-Allow-Origin' header is present on the requested resource. Origin 'http://localhost:4000' is therefore not allowed access.
In case you are feeling lazy to try that out on your own, download this small AngularJS demo web application that runs on a simple node server (You will have to have NodeJS installed on your machine to run the node server. If you don't have it, download NodeJS from NodeJS web site and install it).
All you need to do is to go to public\controller\controller.js and assign $scope.domainName variable, the invoke URL of YOUR API deployment. Then run the node server which will make it listen to incoming connections on port 4000. Go to http://localhost:4000/, enter a value for the ID and hit Go and if you bring up the console of the developer tools of your browser, you definitely will be seeing this error.
In case this is the first time you see this error, the reason you are getting this is that browsers usually do not allow cross domain asynchronous HTTP requests simply to enforce security and avoid attacks like XSS. The only way such HTTP requests are allowed is to have the Access-Control-Allow-Origin header set on the response coming from the target domain. If you look at the response headers in our case you can see the above said header is not present in the response.

To fix this we need to go back to the API Gateway and click on the {employee-id} resource. On the right hand side pane click the button Enable CORS which stands for Cross-Origin Resource Sharing.
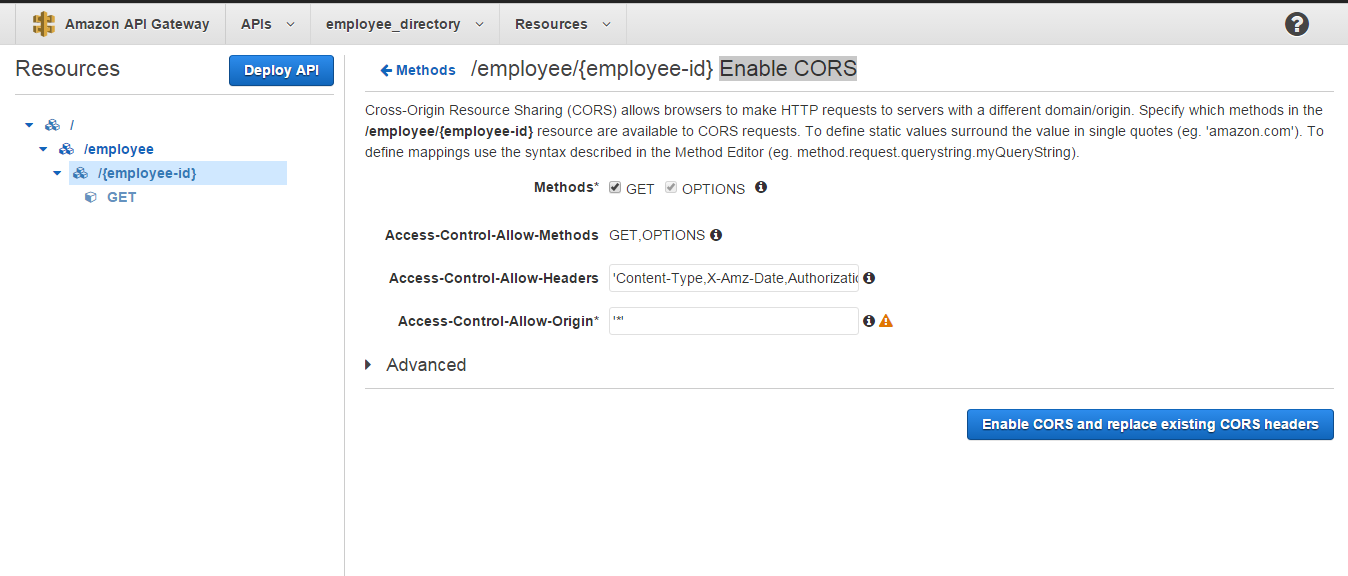
There you get to select the methods that you need to enable CORS for which will have all of them selected by default. On the Access-Control-Allow-Origin* field you get to specify the domains that can access this resource. The ‘*’ input there by default is a wildcard that allows any origin to access this resource. For our demo application these default settings serve to be fine and we can click on Enable CORS and replace existing CORS headers button. Click yes when prompted for confirmation. Finally to make the changes you made take effect, click on Deploy API again, select the same stage that you had created earlier and click Deploy.
Now when you go to our demo application, enter an id and hit Go, you should be seeing the details of that employee like this.


This is all that I planned on sharing with you in this blog post. I should also mention that every single bit of this knowledge I have shared here is from the experience I gained from the work I did at 99X Technology as an intern.
Up next will be a tutorial on how to use Amazon Cognito service for authenticating users in a web application. Do stay tuned!

Great... Excellent sharing... This is very helpful for beginners. Read that provide me more enthusiastic. This helps me get a more knowledge about this topic. Thanks for this.hunt aws jobs in hyderabad
ReplyDeleteSuper Blog! very useful information to the users . For more knowledge on AWS AWS Online Training Hyderabad
ReplyDeleteIt’s really interesting content and nice post AWS online Course Hyderanbad
ReplyDeleteGreat Article. I am glad that I saw this post. It is informative blog for us and we need this type of blog thanks for share this blog, Keep posting such instructional blogs and I am looking forward for your future posts.
ReplyDeleteDigital Marketing Training in Chennai
Digital Marketing Course in Chennai
Saham bernilai memiliki rasio harga terhadap pendapatan (PE) rendah, yang berarti lebih murah untuk dibeli daripada saham dengan PE lebih tinggi. cek juga Apa yang Terjadi dengan Saham GameStop dan Trader Reddit? Ini Dia Ulasan Lengkapnya! dan markets Saham bernilai mungkin merupakan saham pertumbuhan atau pendapatan, dan rasio PE mereka yang rendah mungkin mencerminkan fakta bahwa mereka tidak disukai investor karena alasan tertentu. Orang-orang membeli saham bernilai dengan harapan pasar bereaksi berlebihan dan harga saham akan pulih.
ReplyDelete